 |
Center Weighted Versus Averaging Versus Spot MetersThe first step to accurate light reading is to know the type of exposure meter you are using. Whether a separate hand-held type or built into your camera, the meter is usually one of three kinds; a center weighted meter which reads an overall area but is more sensitive to the middle of that area; an averaging meter which reads the light intensity for an overall area; or a spot meter which gives the light value for a limited area. Some center weighted or averaging meters also can be switched to spot metering. Remember that proper exposure is the correct combination of shutter speed and f/stop. Those two judgments determine the amount of light enter the lens. With manually operated meters, generally the photographer selects the shutter speed and then turns the aperture of his lens until a pointer in his viewfinder aligns with another needle or is centered between two brackets to indicate that the correct exposure has been set. On some models a light-emitting diode (LED) or liquid-crystal display (LCD) will signal when the exposure is correct. lf an exposure meter’s pointer is not located within the viewfinder, as with exterior mounted camera meters, the photographer checks the needle’s position on the meter’s scale and then sets the exposure. Good hand held meters feature an exposure lock to hold the light reading indicator (needle, LED, or LCD) for the photographers reference until another light reading is made. There is no reason the photographer has to set his shutter speed first and f/stop second, although most do out of habit. A desired f/stop can be selected first, and it should be if depth of field is a concern. Then the shutter speed dial is rotated until the meter needle, LED, or LCD indicates a correct exposure. However, if stopping or blurring the action is important to your picture, selecting the shutter speed first would be best. Of course, a camera with automatic exposure control may feature aperture priority (you set the f/stop first, the camera adjusts the shutter speed) or shutter priority (you choose the shutter speed, the camera sets the f/stop) or For manual exposure control, turning shutter speed and aperture controls to correctly align the exposure indicator on a camera’s built-in meter is not really a problem. Nor is it difficult to read the exposure scale of a hand-held meter. Then what is the most common error concerning exposure meters, whether hand-held or built-in and manual or automatic? When the photographer fails to aim his meter properly, poor meter readings occur. And poor photographs are the result First the cameraman must know his meter's angle of acceptance. That is the degree or amount of the subject his meter is reading. This angle is measured in degrees (°) and should be indicated in the operating instructions issued by the meter's manufacturer. Some hand held meters can be adjusted to vary the angle of acceptance. Through-the-lens center-weighted meters and averaging meters take in the full field of view seen by the photographer in his viewfinder. These meters have their photocells inside the camera and read only the light admitted by the lens. They generally compensate for the specific lens being used, whereas camera meters with an exterior mounted photocell cannot. Which meter is best center-weighted, averaging, or spot? Each has its advantages, and Regardless of their type, all exposure meters read and average the light and dark areas of a scene or subject Problems can arise, however. If too much of the less-important picture area is dark, the meter calls for a greater exposure than is actually needed. Likewise, a scene or subject that is bright in much o the picture area may give a meter reading that results in an underexposure. When a scene or subject includes both very dark and very bright areas, the photographer must decide on the portion of the picture he wants most. And he should base his exposure on the meter reading of that area. For instance, if you’re photographing the Grand Canyon, your viewfinder may include a bright and uninteresting sky, so don't read the sky. If the canyon itself is the main subject, an exposure reading must be made for the canyon. Otherwise the meter averages the dark of the canyon and the bright of the sky, and neither is emphasized. Exposing for the canyon will lighten the sky somewhat but give detail to the canyon, the most important part of your picture. If, however, a vivid blue sky with fleecy white clouds hovering over the canyon
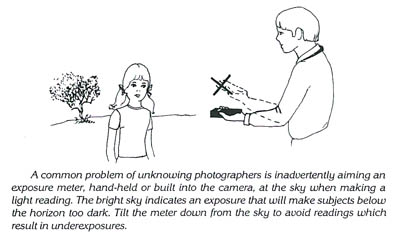
I must reemphasize: Be alert for extremes in contrast. For example, in making a portrait of a fair-skinned person in dark clothing against a dark background, reading the area seen in your viewfinder would indicate an exposure greater than required to get detail in the person’s face, the picture's center of interest. Unless a meter reading is made for the face, the excessive dark clothing and background will give an exposure reading that overexposes and lightens the face too much. However, you may want to increase exposure somewhat, in order to add some detail to the dark clothes and background. By the way, a very common reason for poor exposures is inadvertently pointing the meter, especially a hand-held type, toward the sky. The result is an underexposed picture. Aimed above the horizon, the meter thinks the scene is bright and indicates this. And the picture area you want, below the horizon, turns out too dark. That's your fault and not the fault of the meter. Spot meters read a minimum portion of the overall scene. They give you an accurate exposure reading of a particular spot. This can be helpful. For instance, in making a portrait of a person in dark clothing against a dark background, the spot meter can be pointed solely at the face for a light measurement. The excessive dark areas surrounding the light face will not influence the exposure reading. Again, however, you may want to increase exposure somewhat, in order to add some detail to the dark clothes and background. Alternatively and often recommended in the owners' manuals for cameras with through the-lens meters, you can include in one spot reading equal portion of a light area and a dark area like the exposure indicated. Photographers with spot meters also will want to take readings that give the best overall exposure for a subject that includes both light and dark areas. A common way to do this is to make separate readings of the dark areas and light areas in the picture, then average the results and set your exposure. A spot meter is especially useful when there is strong back lighting on a subject Also, when a subject is too far away to approach for a close reading with a center-weighted or averaging meter, a spot meter will do the job. Without a spot meter, and if you're unable to get close enough to your subject for a reading, try reading an area nearby that is similar in lighting and contrast. For instance, taking a reading off the palm of your hand is a good substitute for reading the face of a person of similar skin tone who is some distance away. This hand reading can be helpful for determining exposure, especially if you are making candid pictures of people with a telephoto lens. Make sure the angle and amount of light falling on your palm is the same as that falling on your subject.
So far the discussion of meters, hand-held and built in, has referred to their use as reflected light meters, As such, the meters read the light reflected off the subject. The other type, incident-light meters, read the light shining on the subject. In this case, the meter is placed
A reflective meter reading is, however, by far the most common method of determining exposure. This is because with a reflected-light meter you can read the various areas of contrast (lightness and darkness) in your picture area and set your exposure accordingly. Incident meters are most often used in studio and indoor situations where the lighting Making Accurate ExposuresBe aware that an exposure meter always reports the average light intensity of the subjects included in its angle of acceptance. Appropriately, shadows will be dark and highlights will be bright. However, if detail is wanted in the shadow area, an exposure reading of this dark area alone should be made. Since the meter always averages the light it reads, shadows will not be recorded dark or black (as with a reading of both dark and light areas) but a shade of gray, thus giving more detail to the shadowed area. Similarly, if detail is desired in a highlight area, a meter reading should be made of this bright area alone. Again, since the meter always averages the light it reads, highlights will not be recorded white (as with a reading of both light and dark areas) but a shade of gray, thus giving more detail to the highlight area. Normally, with subjects offering a full range of light contrasts, users prefer to expose more for the darker areas in order to get shadow detail on their prints. Highlight areas, which will be recorded too bright, can be darkened to more natural tones with the use of photo enhancing software.
|
|
 When subjects in your picture are of extreme contrast (some very light and some very dark), generally it's best to aim your meter at the most important part of the picture to take an exposure reading. With a less extreme contrast range, separate readings of the dark and light areas can be made and then averaged to determine the exposure setting. Of course, when your subject area has little variation in contrast, an overall reading will do. Learn to read the light with your eyes before reading it with your exposure meter.
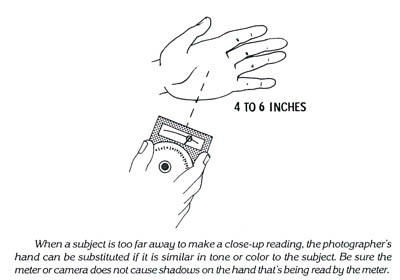 Regardless of the meter, you must know its limitations and abilities, and how to use it. Experience tells you the results you can expect with a certain meter. Nevertheless, bracketing can save the day if you are uncertain about the exposure of some subjects. Try several exposures of the same subject and compare your results to determine the best exposure for your purposes.
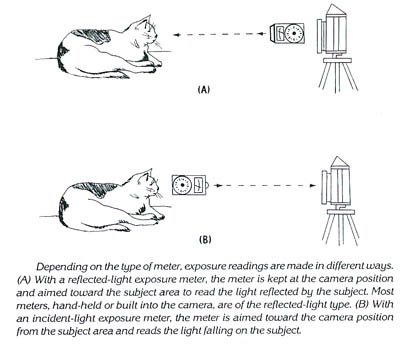 Many hand-held reflective type meters are designed to be incident meters, too. A piece of white translucent plastic snaps on or slides in front of the meter's light sensitive cell. When this is in position, the meter can be used to make incident readings.